 |
 |
|
 |
DS150
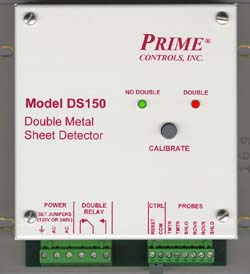
Dual Probe Double Metal Sheet Detectors
Metal blanks that are free to bounce or move vertically as much as 75 mm (3 inches) in a conveying system are easily monitored by Prime's Model DS150. It senses many different metals by using separate transmitter and receiver probes that can detect metal within a 3” (75 mm) range. It inspects over a thickness range of 002” to .320, (.05 mm to 8 mm). Calibration is completed by pressing a push-button located on the front cover with a nominal and double sample. It immediately senses several conditions and sets the double reject threshold. If it detects any system failures, while operating, it begins flashing one of its indicators and switches its output to reject. The DS150 is an excellent detector for steel, aluminum, tinplate, thick *stainless steel, copper, brass and many other metals.
* thin stainless, copper and aluminum film may require a Model DS3410 |
|
| |
| Dual Probe Double Metal Sheet Detectors |
Features
-
•Push-button calibration, instantaneously sets reject threshold and adjusts signal for type and thickness of metal detected.
•Multi-gauge double detection without calibration changes.
•Thickness Detection range of .05 mm to 8 mm (.002” to .300”) provides flexibility for a broad range of thickness applications and metals.
•Diagnostic warning is provided through various indicator flash patterns for error and probe failure.
•Power Input is user configured to 120 Volts AC or 240 Volts AC @ 50-60 Hz.
•Wide trans./rec. probe separation to 75 mm (3”) when used with P70CS on light gauge steel.
•Quick connect terminals for fast replacement, and to reducing downtime.
•Contact relay output to interface with most input or control circuits, contacts rated at 10 AMPS (½ HP) @ 240 Vac, 8 AMPS @24 VDC.
|
|
- Power Input: 100 to 240 VAC, 50/60 Hz 300 mA operating load
- Output: 2 SPDT contact relays Max load: 10 Amps @ 240 V AC 8 Amps @ 24 V DC ½ HP @ 240 V AC
- Output Fail-safe: Defaults to reject w/power off
- Output Response: adjustable to < .030, .100, .500, 1 second
- Thickness Range: .5 to 2 ounce copper plate, nonmagnetic stainless steel. (for magnetic SS see our latest DS1500 Family)
- Probes: All probes beginning with P1C, P1CS, type "AX"
- Probe Separation: 12 mm to 75 mm (.5 to 3”) or more. Max. varies w/(metal, thickness & probe, separation). Maximum range is realized with Model P1CS transmitter & receiver probes.
|
- Calibration Methods: Push-button switch used to measure thickness between probes during calibration. Manually place sample between probes, push Calibration button.
- Enable Input: enables inspection timer.
- Over and Under Reject Threshold: factory set at 50% between nominal and calculated double. Reject threshold may be changed by user over a range of 1 to 99%
- LED Indicators: Green for single, Amber for Over, Under & Nothing detected.
- Display Indication: 2 digit LED, alphanumeric, .5 inch high. Setup menu, calibration mode, operating probe signal strength, fault codes
- Sensor Operation: Eddy Current in metal impedes signal from transmitter to receiver. Impedance changes as metal thickness changes.
|
|
|
 |


